Swift Package Manager has been out for a few years now, but I’ve only recently authored my first one. As I continue to move things over to Swift at my job at Buffer, I decided to centralize some of our logic into a Swift package.
The process is fairly no-nonsense, but there are three quick things to note which I ran into. Also, I should note these apply to those of you distributing your package with Git - which I assume most developers are. Also, I just can’t even with package managers, so I’m probably holding things wrong somewhere along the way.
Gotcha 1: The Default Package Structure Won’t Work
When you go to Xcode and choose File -> New Project -> Multiplatform -> Swift Package, the default folder structure won’t mesh well with Git. To demonstrate, let’s say you work up your package and then go into an existing Xcode project to import it. Mercifully, that’s all easy - simply add your new package like you would any other and slap in the URL where it lives in Github.
What happens next is that you’ll like get an error like this: "the package manifest at '/Package.swift' cannot be accessed (/Package.swift doesn't exist in file system)", or similar. What this is actually trying to say is The Package.swift file has to be at the root of the project., and that’s not what happens by default on the file system.
let concatenatedThoughts = """
I was relieved at how easy this was to do with private repos as well. There are no extra configuration steps, which other package managers have conditioned me to think about. Rather, Xcode will pop up a modal to enter in credentials if need be, and that's that.
"""
This makes sense, because you typically (if you’re like yours truly) create the Xcode project and then create a Github repo for it. When you clone the repo, it makes another folder on your file system (i.e. Documents/Projects/Thing_I_Just_Cloned) but your project already lives at Documents/Projects/CoolThing. I usually end up dragging the project I already had into the new, freshly created folder from Github.
Therein lies the issue.
When your project is open in Xcode, is appears as though the Pacakge.swift file is at the root (and it is, as far as Xcode can see) but you need to make it appear that way in git, too. To fix this:
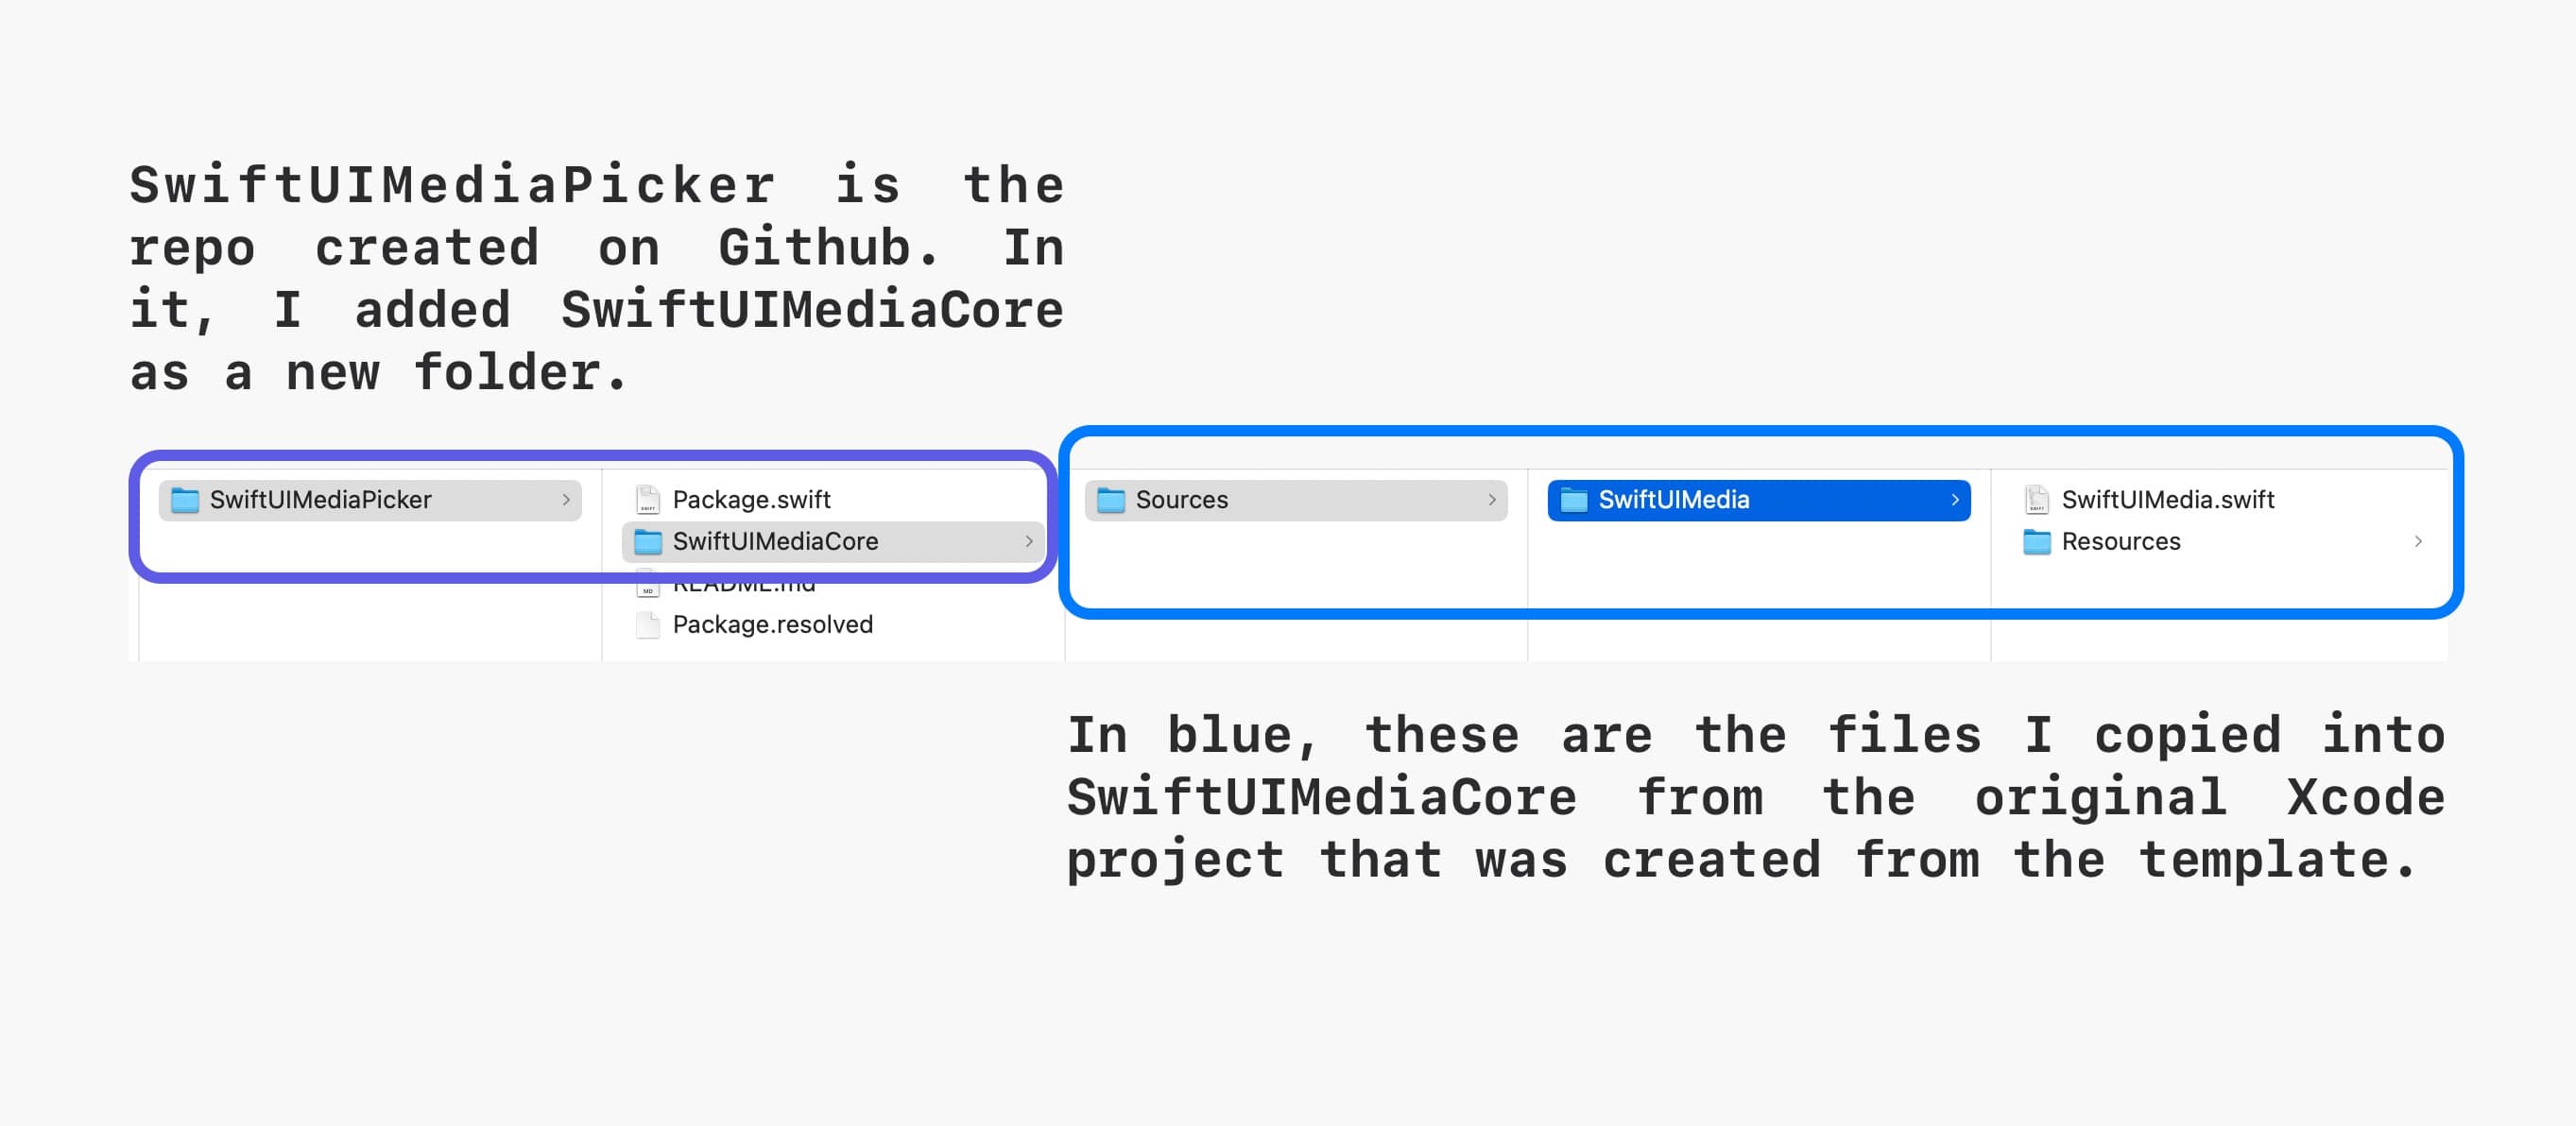
- In the folder that was just created from cloning the new repo in Github, I create a new folder called something like “ProjectCore”.
- Then, I copied all of the source files in the existing Xcode folder created from my package there.
- Lastly, I put
Package.swiftandPackage.resolvedat the root level of the repo folder from step 1.
A picture is easier to demonstrate, but this is what it looks liked for me:
The last step, and this is critical - is to update your Package.swift file target entry to point to where things are at now:
targets: [
    // Before, there was no `path` parameter used.
    .target(
        name: "SwiftUIMedia",
        path: "SwiftUIMediaCore/Sources/SwiftUIMedia")
]
With this setup, the package pulled into my other Xcode projects just fine without issue. Note that you’ll have to close and reopen the local package within Xcode again since its location on the file system will have changed. For more on this little issue, you can check out this Stack Overflow answer, which is what led me to this solution.
If you know of a better way to get around this little dance, please give me a shout. For now, moving on.
Gotcha 2: Adding Target Dependencies
Look around the internet and Apple’s docs, and you’ll find a lot of useful information on how to add package dependencies. But, what I couldn’t find was an obvious way to associate those dependencies to your specific targets. Here’s how:
let package = Package(
    name: "SwiftUIMedia",
    platforms: [
        .iOS(.v16)
    ],
    products: [
        .library(
            name: "SwiftUIMedia",
            targets: ["SwiftUIMedia"]),
    ],
    dependencies: [
        .package(url: "some_github_url", .upToNextMajor(from: "2.2.4"))
    ],
    targets: [
        .target(
            name: "SwiftUIMedia",
            dependencies: [
                .product(name: "SPM_Product_Name", package: "SPM_Package_Name")
            ],
            path: "SwiftUIMediaCore/Sources/SwiftUIMedia")
    ]
)
I could have this wrong, and I could be glossing right over the relevant documentation for this, but it seems this is how to get it all hooked up. Take Nuke’s Package.swift file, for example. You’d add it like this for a package wide dependency:
dependencies: [
    .package(url: "https://github.com/kean/Nuke", .upToNextMajor(from: "12.1.0")),
]
And, for each target which used it - it’d look like so:
targets: [
    .target(
        name: "SwiftUIMedia",
        dependencies: [
            // Check out the link above to see where `name` and `package` came from
            .product(name: "Nuke", package: "Nuke")
        ],
        path: "SwiftUIMediaCore/Sources/SwiftUIMedia")
]
After that, I was Nukin’. To me, how to make those associations weren’t immediately obvious. But again, package managers have never been my forté - so if there is a more “correct” way, teach me.
Gotcha 3: Accessing .xcasset Resources
This last one is elementary to fix, but I didn’t catch it up until a nice runtime exception hit me in testing. In short, you’ll need to specify that you’re accessing asset catalog resources within the bundle’s module.
So, instead of that…
Image("Test")
Color("BrandBlue")
…you’d do this:
Image("Test", bundle: .module))
Color("BrandBlue", bundle: .module))
We need to use Bundle.module when accessing resources in our source code for the package, which makes sense because they should not assume they know where the specific location of a resource might actually be. Luckily, Xcode recognizes several Apple-proprietary file formats and asset catalogs are one of them. So, there’s no other steps you need to do to get them to pull in with your package other than adding them under /Sources for the relevant target.
Bonus: Share the Love
And hey - why not share your package with the world since you’ve put all of that hard work into it? Consider popping over to the Swift Package Index and adding your work here, it’s quick and easy - plus everyone can benefit from your code. Personally, I’ve picked up several tips from browsing other packages not only for code, but to see how they setup their own packages to work through some of the things I’ve listed here.
Final Thoughts
Swift Package Manager has been my preferred way to handle dependencies for some time now. I simply enjoy that I can interact with it directly within Xcode, which makes the whole experience feel a little more integrated to me. It has issues when it comes to larger teams, sure, and in fact - CocoaPods continues to grow. Regardless, if you want to get started with creating packages yourself, hopefully these three little obstacles won’t be in your path now.
Until next time ✌️